How To Spruce Up Your Holiday Gift Wrapping In 4 Easy Steps
Hi All, Dave & Tyna here! Today, we’re sharing a fun DIY for modern, sleek gift wrapping, an idea that sprouted while we were learning about calligraphy. We’re so excited to share this tutorial with you guys on how to seal your gifts with wax seals especially since the holidays are growing ever closer!
The history of wax seals can be traced to the Indus Valley and Mesopotamian civilizations and are believed to have been used as early as 3300 BCE. In early use, they were created with clay and impressed using handmade cylinders or rings. Recently, they’ve become popular again in modern forms of correspondence. Since we’ve both always loved the elegant feel wax seals add to anything you pair with them — whether that be wedding invitations, letters, or even using to seal gifts like we are for this DIY — we thought Christmas would be the perfect time to try our hand at creating our own.
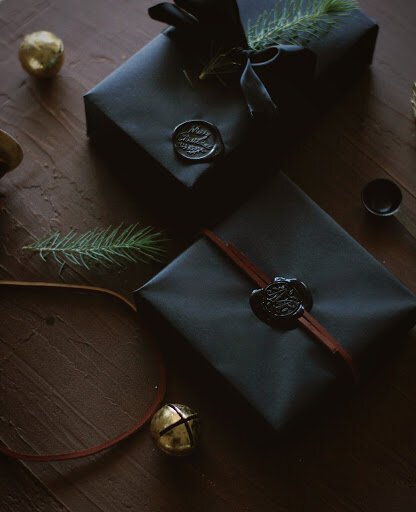
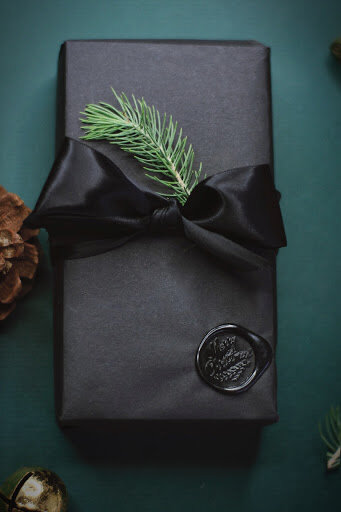
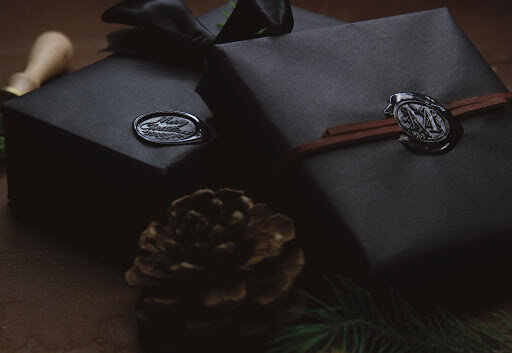
Last year we chose a traditional Christmas vibe with reds and greens but this year, we decided on a moody, masculine color palette with blacks, browns, and forest greens. We grouped the stamps with matte black Kraft paper, leather lace, and black ribbon for the perfect presentation. You can get wax stamps custom made for any special occasion and they’re actually really fun to make. So let’s get started!
Tools & Supplies
Wax stamp(s): We ordered this “M” monogrammed wax stamp from Amazon to denote our last name. We also used this Christmas wax stamp we picked up at Hobby Lobby.
(1) bag of wax beads: We ordered this bag of 170 black wax beads from Amazon
Candle or wax seal warmer: You’ll need to this to melt the wax for sealing.
Melting spoon: You’ll need this to safely heat and spoon the wax.
Leather lace: This one is optional but will definitely add a little personality to your wrapped gifts!
Ribbon: We used black ribbon to tie a bow around the gift before sealing with the wax.
Black Kraft paper or Gift wrap of choice
- Wrap Your Gifts
The first step is to wrap your gifts with kraft paper or any gift wrap you’d like to use.
Not the best at wrapping gifts? Check out one of our favorite tutorials from Gifts.com that will walk you through the process in 5 simple steps!
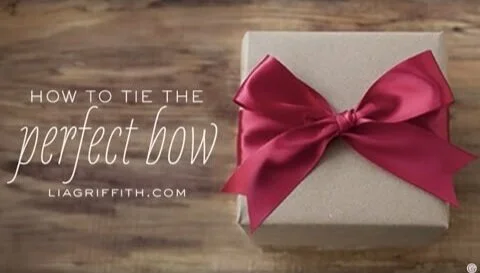
- Tie The Perfect Bow
For one of the gifts I wanted to add a black shiny bow that would provide a stark contrast with matte black Kraft paper but of course, you can use any bow you’d like. I don’t know about you guys but it takes me quite some time to create a good bow. I always use this helpful video below by Lia Griffith whenever I need to tie the perfect bow. It’s helped me every time!


- Prepare the Wax
Next, you’ll need to light the candle warmer and add 3-4 wax beads to your melting spoon to create a perfectly sized seal. Note: When we used more than 3-4 beads, we noticed the edges spread and ran out, creating an extremely messy look (and workstation!).
- Pour & Press
Before pouring, make sure all of the wax is completely melted. Next, pour the wax in an even, circular motion until the melting spoon is empty of all wax. Press your stamp on the wax and hold it for about 30 seconds before removing.
Note: If you’re using leather lace, you’ll need to arrange the lace around the package before beginning to pour. Then, you’ll pour the wax over the overlapped edges to seal it to the package.
Finally, allow the wax to cool and harden. And Voilà! — beautiful wax seals without having to break a sweat or the bank!


Did this tutorial help you to DIY your own Wax Seals? We’d love to see how your finished gifts!
Tag us in your Instagram creations for a chance to be featured in our insta stories! Use @project1826 and the hashtag #project1826.